
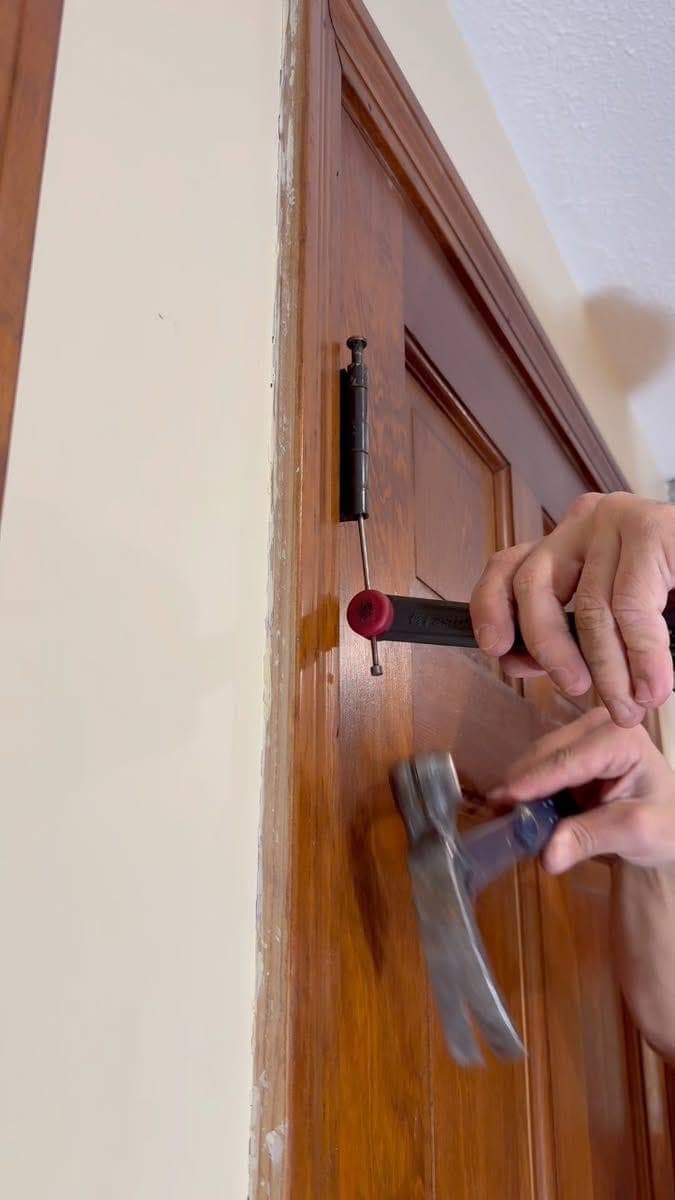
We interact with doors and locks dozens of times a day, yet they are often the most neglected components of a home. We only tend to notice them when they start sticking, squeaking, or—worst of all—when a key snaps in the lock. In Singapore’s humid climate, doors and locks face unique challenges: warping wood, rusting metal, and dust accumulation that can jam precision mechanisms. Proper maintenance not only ensures smooth operation and security but also extends the lifespan of your fixtures, saving you from costly replacements. Here are the essential door and lock maintenance tips every Singapore homeowner should know. 1. The Humidity Factor: Wooden Doors Solid timber or laminated wooden doors are a staple in Singapore homes. However, our tropical climate (with humidity often exceeding 80%) can cause wood to expand, contract, or warp over time. Common Issues: Sticking Doors: The door rubs against the frame, especially during wetter months. Warping: The door develops a curve, preventing it from closing flush. Peeling Laminate: Moisture seeps under the laminate finish, causing it to bubble or peel. Maintenance Tips: Issue Solution Sticking Door Locate the rubbing area (look for shiny spots on the door or frame). Sand down the high spot lightly with medium-grit sandpaper. Seal the sanded area with clear varnish to prevent moisture absorption. Warping Minor warping can sometimes be corrected by placing heavy weights on the door overnight. For severe warping, replacement may be necessary. Peeling Laminate Apply wood glue or laminate adhesive under the lifted section and press firmly. Use a clamp or heavy object to hold it in place for 24 hours. General Protection Apply a coat of wood sealant or varnish every 1–2 years to create a moisture barrier, especially for doors exposed to rain or bathroom humidity. Pro Tip: For bathroom doors, ensure there is a gap of at least 15–20mm between the bottom of the door and the floor to allow for air circulation, preventing moisture buildup on the wood. 2. Sliding Doors: Tracks and Rollers Sliding doors—whether for wardrobes, balconies, or room dividers—are popular in Singapore flats for their space-saving design. However, the tracks are magnets for dust, hair, and debris. Common Issues: Difficult to slide: The door feels heavy or gets stuck midway. Squeaking: Metal-on-metal friction creates irritating noises. Derailment: The door jumps off the track. Maintenance Tips: Clean the Track Regularly: Use a vacuum cleaner with a narrow nozzle or a small brush to remove dust and debris from the track. For stubborn grime, use a damp cloth followed by a dry one. Lubricate Correctly: Do not use grease or oil on sliding door tracks—it attracts more dust. Instead, use: Silicone spray (applied sparingly) Dry lubricant (like WD-40 Specialist Dry Lube) Paraffin wax (rub along the track for a smooth, non-sticky glide) Adjust Rollers: Most sliding doors have adjustment screws at the bottom corners. Tightening or loosening these can raise or lower the door to ensure it runs smoothly along the track. Check for Bent Tracks: Inspect the track for dents or bends. Minor bends can sometimes be gently tapped back into shape with a rubber mallet. Pro Tip: For balcony sliding doors exposed to rain, periodically check the drainage holes at the bottom of the track. Clear any blockages to prevent water from backing up and seeping into your home. 3. Lock Mechanisms: Prevention is Better Than Cure A jammed lock can leave you locked out—or locked in. Lock maintenance is straightforward but essential, especially for main doors and gate locks that see daily use. Common Issues: Key sticks or turns with difficulty Lock feels gritty or stiff Key snaps inside the lock Maintenance Tips: Lubricate Locks Annually: Use graphite powder specifically designed for locks. Insert the nozzle into the keyhole and puff a small amount. Insert and turn the key several times to distribute the powder. Important: Do not use oil-based lubricants (like WD-40 standard formula) in locks. Oil attracts dust and gum, causing more problems over time. Clean Keys: Dirty or worn keys can damage the lock pins. Wipe your keys with a dry cloth periodically. Check Screws: Loose screws on door handles, latch plates, and strike plates can cause misalignment, making it difficult to lock or unlock. Tighten them every 6 months. Address Misalignment: If the latch does not align with the strike plate (the metal plate on the door frame), the lock may not engage smoothly. Use a file to slightly enlarge the strike plate hole or adjust the hinge screws to realign the door. Pro Tip: For digital or smart locks, replace batteries before the low-battery warning appears. Use high-quality alkaline batteries, and wipe the fingerprint sensor regularly with a microfiber cloth to maintain responsiveness. 4. Hinges: The Silent Workhorses Hinges bear the weight of your door and endure constant movement. Neglected hinges lead to sagging doors, squeaking, and eventually, structural issues. Common Issues: Squeaking or creaking when the door opens or closes Sagging: The door droops, causing the latch to miss the strike plate Rust: Metal hinges in bathrooms or exposed areas can corrode Maintenance Tips: Lubricate Moving Parts: Apply a small amount of light machine oil or silicone spray to the hinge pin. Open and close the door several times to work the lubricant in. Wipe away any excess to prevent drips. Tighten Loose Screws: Over time, hinge screws can loosen. Tighten them with a screwdriver. If a screw hole is stripped and no longer holds, use a longer screw or insert a wooden toothpick with wood glue into the hole, break it off, and then re-screw. Remove Rust: For surface rust on hinges, use a mixture of baking soda and water to form a paste. Apply, let sit for 10 minutes, scrub gently with a soft brush, and wipe clean. For chrome or stainless steel hinges, a metal polish can restore shine. Pro Tip: If a hinge is consistently squeaking despite lubrication, the hinge pin may be worn. Consider replacing the entire hinge rather than continuing to lubricate a failing component. 5. Gate Maintenance: The First Line of Defense Many Singapore homes, especially HDB flats, have a metal gate in addition to the main wooden door. Gates are exposed to the elements and require specific care. Common Issues: Rust formation on welded joints or where paint has chipped Roller wheels (for sliding gates) becoming stiff or noisy Lock mechanism exposed to rain Maintenance Tips: Rust Prevention: Inspect your gate every 6 months for rust spots. Sand down any rust patches, apply a rust converter if necessary, and touch up with matching metal paint. Lubricate Moving Parts: For sliding gates, lubricate the roller wheels and track with silicone spray. For swing gates, lubricate the hinges as described above. Gate Lock Care: Gate locks are often exposed to rain. Apply graphite powder regularly, and consider using a weatherproof cover for the lock cylinder if it is directly exposed. Pro Tip: When painting or touching up your gate, avoid painting over the lock cylinder. Paint residue can gum up the mechanism and make key insertion difficult. 6. Weather Stripping: Energy Efficiency and Pest Control Weather stripping (the rubber or brush seals around doors) is often overlooked but plays a crucial role in keeping your home cool, quiet, and pest-free. Common Issues: Deterioration: Rubber strips become brittle, crack, or fall off over time. Gaps: Worn stripping allows air conditioning to escape, increasing electricity bills. Pest Entry: Gaps under doors are common entry points for cockroaches and lizards. Maintenance Tips: Inspect Annually: Check the condition of weather stripping around your main door, balcony doors, and bedroom doors. Replace When Worn: Weather stripping is inexpensive and easy to replace. Measure the length needed, remove the old strip, clean the surface, and press the new adhesive-backed strip into place. Door Sweeps: For gaps at the bottom of doors, install a door sweep (a brush or rubber seal) to block drafts, dust, and pests. Pro Tip: For HDB main doors, ensure any replacement weather stripping does not make the door too tight to close or open easily. Test the door closure after installation. Quick Reference: Maintenance Schedule To keep everything in top condition, follow this simple schedule: Frequency Task Monthly Wipe down door surfaces; check for squeaks; clean sliding door tracks Every 6 Months Lubricate hinges; tighten loose screws; inspect gate for rust; check weather stripping Annually Apply graphite powder to locks; seal wooden doors (if needed); inspect and touch up gate paint When to Call a Professional While most maintenance tasks are DIY-friendly, some situations require professional help: Broken key inside lock: A locksmith can extract the key without damaging the lock. Digital lock malfunction: Contact the manufacturer or authorized service provider. Structural door issues: If a door is severely warped, the frame is damaged, or hinges are pulling out of the wall, consult a carpenter or contractor. Main door alignment: HDB main doors require specific clearance and fire-rated considerations. If issues arise, consult your town council or a professional familiar with HDB requirements.
In Singapore, the shoe cabinet is often the first piece of furniture guests see—and the last thing you deal with after a long, sweaty day. With our tropical climate, limited entryway space (especially in BTO flats), and the local culture of removing shoes indoors, finding the right shoe storage solution is both a design priority and a practical necessity. A poorly chosen shoe cabinet can mean a cluttered entrance, musty-smelling footwear, and daily frustration. Here is how to choose or design a shoe cabinet that balances style, storage capacity, and ventilation—perfect for Singapore flats. 1. Measure Your Entryway: The "Corridor" Constraint The first step to shoe cabinet success is understanding the unique geometry of Singapore entryways. Most HDB flats and condos feature one of three entry configurations: Configuration Challenge Solution Narrow Corridor Limited width (often < 1.2m); standard 30cm deep cabinets protrude too far Opt for slim-depth cabinets (18–25cm) with vertical shoe storage or tilt-out mechanisms Recessed Niche A built-in alcove next to the main door; depth varies Go for custom built-in cabinetry to maximize every millimeter of the niche Open Concept Entry opens directly into living/dining area; no clear "drop zone" Use a low console or bench to define the entrance without blocking the visual flow Pro Tip: Before shopping, measure your entryway width and depth. Leave at least 80–90cm of walkway clearance after installing the cabinet to comply with HDB fire safety regulations and ensure comfortable passage. 2. Ventilation is Non-Negotiable: Combating Odor and Moisture Singapore's humidity is the enemy of enclosed shoe storage. A sealed cabinet will trap moisture from sweaty shoes, leading to mold, mildew, and unpleasant odors that can waft through your entire home. Ventilation Features to Look For: Slatted or Perforated Doors: The most effective solution. Vertical or horizontal slats allow air to circulate continuously, drying shoes naturally. This is especially important if the cabinet is located in an air-conditioned entryway. Gap at the Base: A 5–10cm gap between the bottom of the cabinet and the floor serves two purposes: it allows airflow underneath and provides a convenient spot to kick off shoes before placing them inside. Mesh or Wire-Front Doors: For a more industrial or modern look, mesh panels offer maximum airflow while keeping shoes discreetly hidden. Built-in Dehumidifier Compartment: Some high-end custom cabinets include a small compartment designed to hold a rechargeable dehumidifier or activated charcoal bags. Pro Tip: Avoid solid, airtight doors for your main shoe storage. If you prefer the look of solid cabinets, mix in at least one section with slatted doors or leave a portion open for frequently worn shoes. 3. Depth Matters: Standard vs. Slim vs. Angled Not all shoes are created equal, and neither are shoe cabinet depths. The depth of your cabinet determines what types of footwear it can store. Depth Best For Considerations 30–35cm Men's sneakers, casual shoes, heels Standard depth; fits most adult shoes placed horizontally 35–40cm Men's size 10+ shoes, boots, shoeboxes Allows for shoebox storage; may protrude in narrow corridors 18–25cm (Slim) Women's flats, sandals, children's shoes Space-saving; shoes must be stored vertically or at an angle Angled Shelves Mixed household sizes Slanted shelves reduce depth requirements while accommodating larger sizes Pro Tip: If you have a mix of shoe sizes in your household, consider adjustable shelves. This allows you to customize heights for flats, heels, sneakers, and boots without wasting space. 4. Maximize Capacity: Smart Internal Layouts A shoe cabinet's external dimensions only tell half the story. The internal configuration determines how many pairs you can actually store. High-Capacity Design Features: Tilt-Out Mechanisms: Popular in slim-depth cabinets, these allow shoes to slide in at an angle, accommodating larger sizes without increasing cabinet depth. Double-Door Access: For corner or wide cabinets, ensure the internal shelving allows full access. A single wide opening often creates "dead zones" in the center where shoes get lost. Pull-Out Trays: For deep cabinets (40cm+), pull-out trays or drawers prevent shoes from stacking behind one another. You can see every pair at a glance. Vertical Dividers: Instead of stacking shoes horizontally, vertical dividers allow you to store pairs standing upright—ideal for flip-flops, sandals, and slip-ons. Capacity Benchmark: A well-designed 1-meter wide, 30cm deep cabinet with adjustable shelving can comfortably store 20–30 pairs of adult shoes. 5. Multi-Functional Designs: Beyond Just Shoes In a small flat, every piece of furniture should work harder. The entryway shoe cabinet is the perfect candidate for multi-functionality. Popular Multi-Functional Shoe Cabinet Ideas: Shoe Cabinet + Bench: A low cabinet with a cushioned top provides a place to sit while putting on or removing shoes. This is especially useful for families with young children or elderly members. Shoe Cabinet + Coat/Key Hooks: Extend the cabinet upward with a back panel fitted with hooks for bags, umbrellas, and keys. This creates a complete "drop zone" in a compact footprint. Shoe Cabinet + Display Niche: Incorporate an open shelf or niche at the top to display decorative items, a small plant, or a catch-all tray for keys and mail. Shoe Cabinet + Mirror: A full-height cabinet with a mirrored front serves as a last-minute appearance check while discreetly hiding shoes behind reflective panels. Pro Tip: If you opt for a bench-style cabinet, ensure the bench height is 40–45cm for comfortable seating—standard dining chair height. 6. Style Trends: Making a First Impression Your shoe cabinet sets the tone for your entire home. Here are the styles currently popular in Singapore flats: The Scandinavian Slim Characteristics: Light oak or white laminates, slim profile (18–20cm depth), slender legs or floating mount Best for: Narrow corridors; minimalist and Scandi-inspired interiors The Industrial Wire Mesh Characteristics: Dark matte finishes (charcoal, black) with wire mesh or perforated metal panels Best for: Modern industrial lofts; prioritizes maximum ventilation The Japandi Low Console Characteristics: Natural wood grains, clean lines, low profile (60–80cm height), often with woven rattan door panels Best for: Warm, organic interiors; open-concept entryways that flow into living areas The Full-Height Statement Characteristics: Floor-to-ceiling cabinetry that spans the entire entry wall, often with a mix of closed and open storage Best for: Larger entryways or flats with a bomb shelter (household shelter) that needs to be integrated into the design
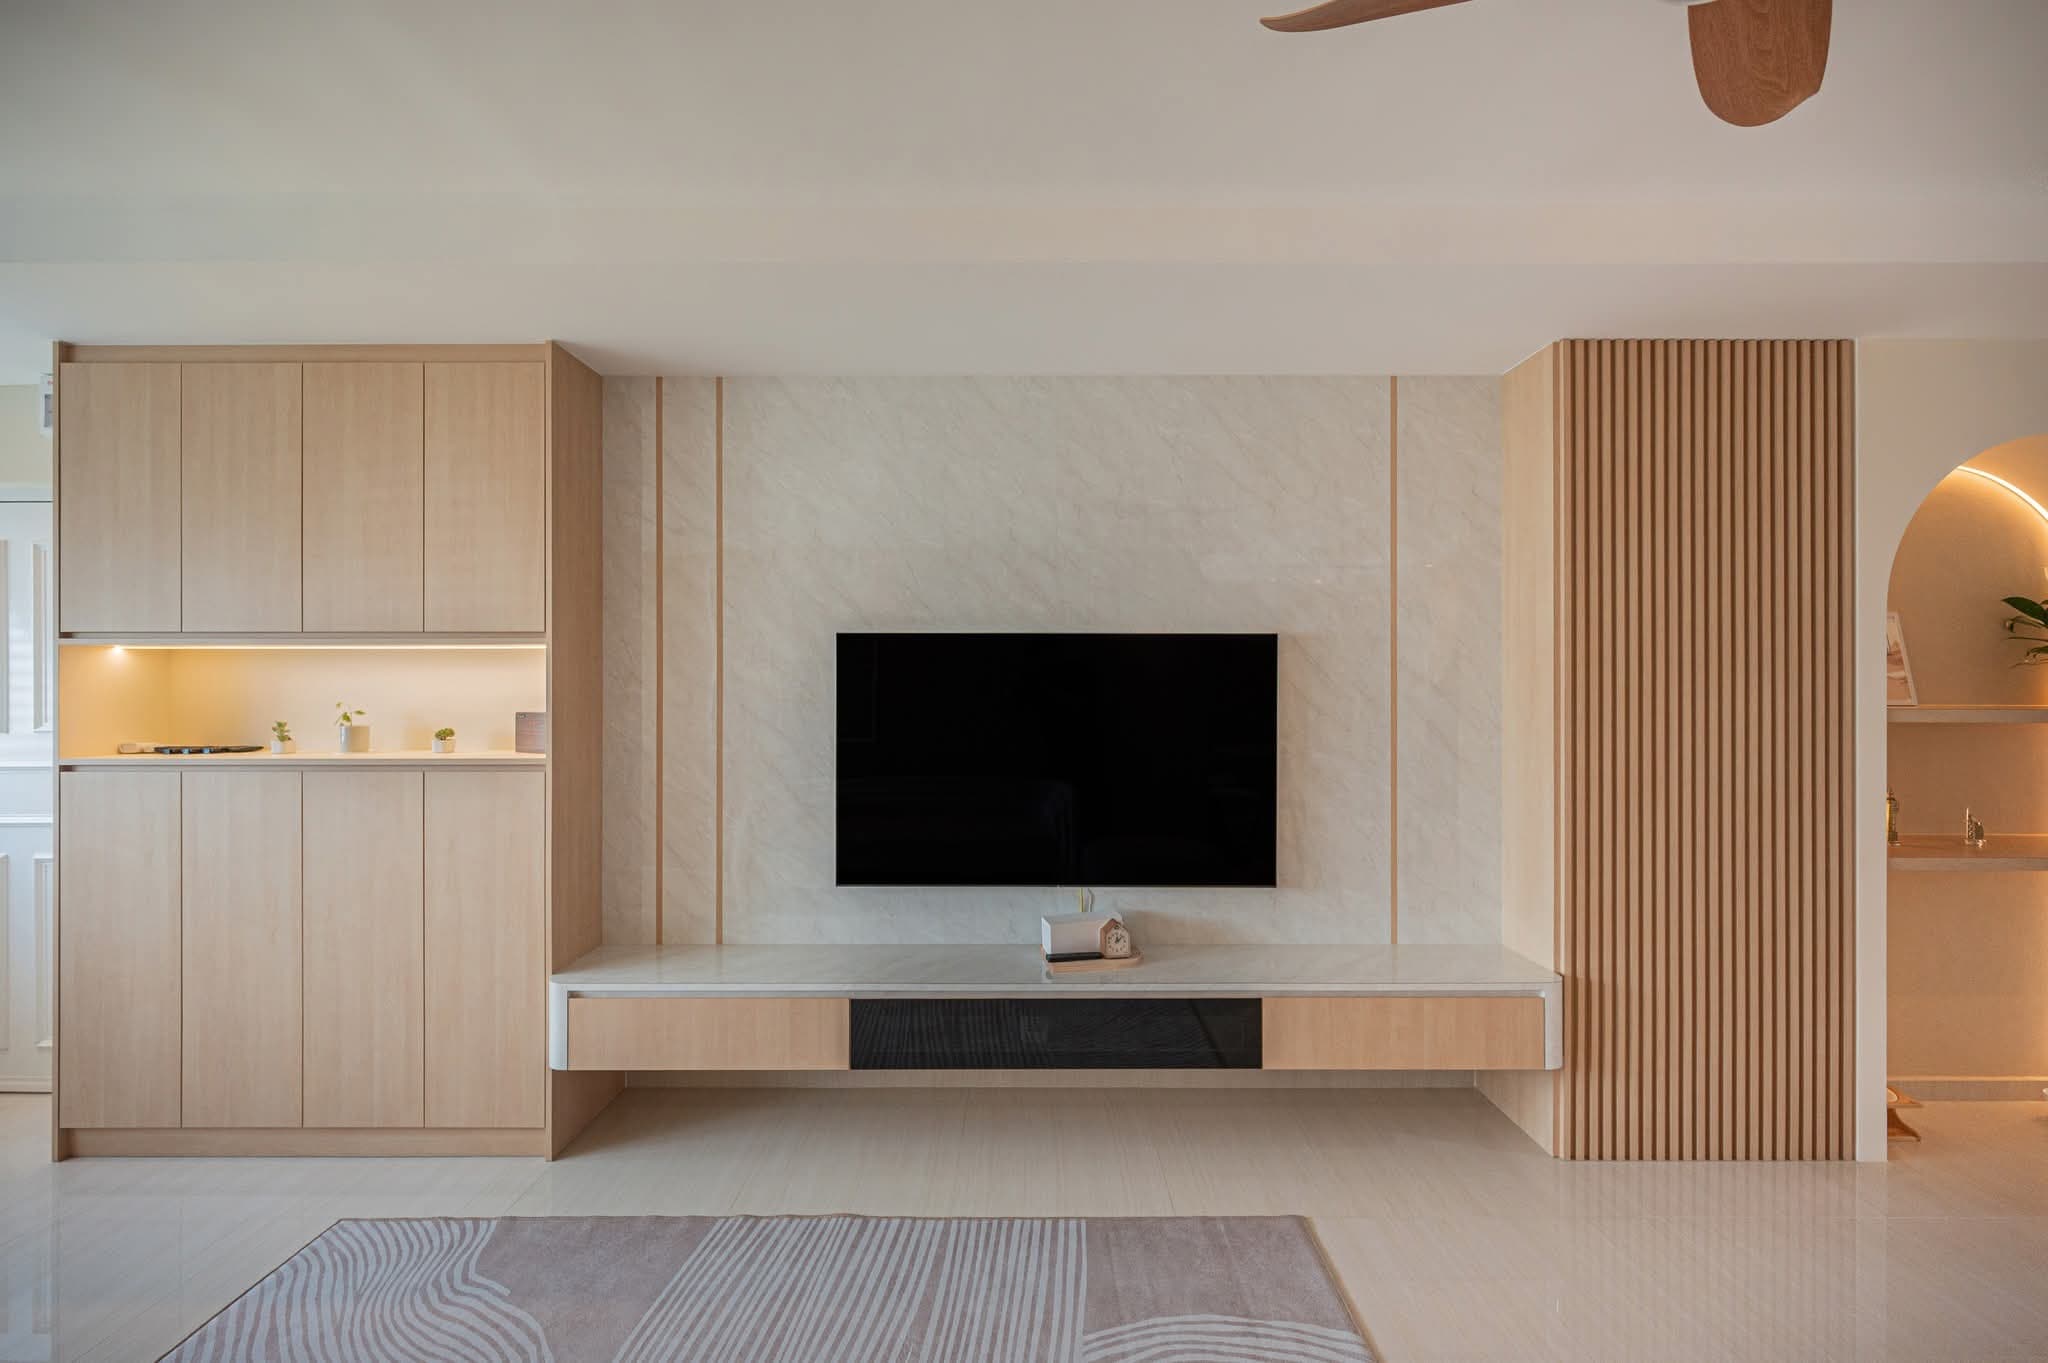
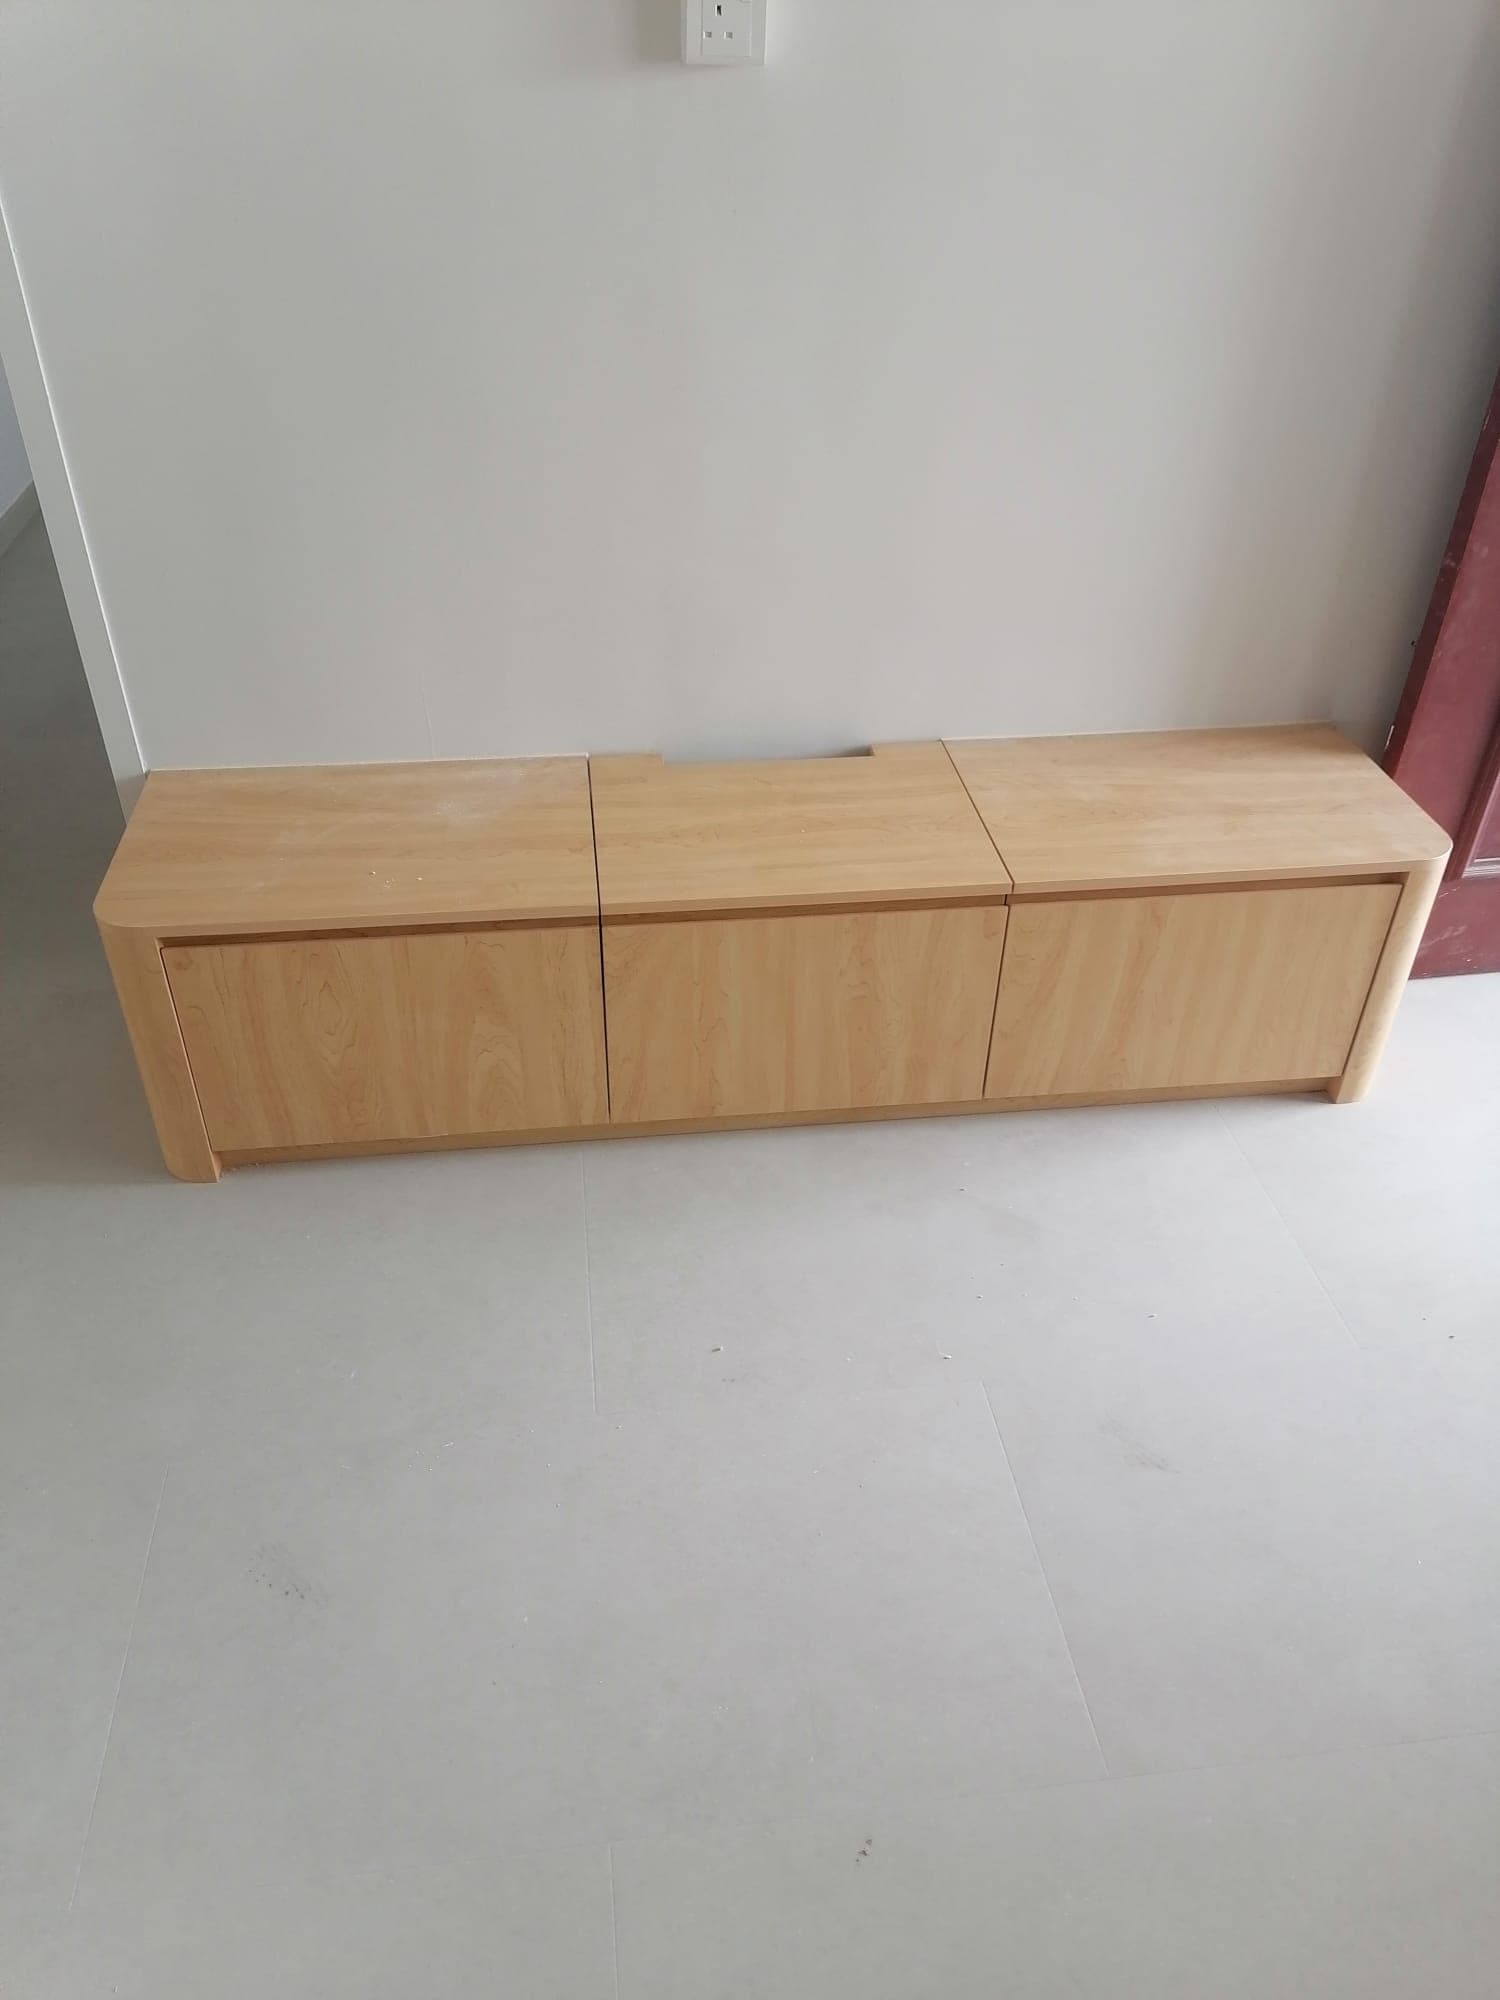
In a small apartment, the TV console is rarely just a stand for your television. It is the anchor of your living room, a storage workhorse, and often the divider between functional zones. With space at a premium, choosing the wrong console can make your living area feel cramped and cluttered, while the right one can transform it into a sleek, organized, and airy haven. If you are struggling to balance style with storage in a compact home, here are the best TV console ideas designed to maximize space without compromising on aesthetics. 1. The Floating Console: Creating Visual Airiness One of the most effective tricks for small spaces is to take furniture off the floor. A floating TV console (wall-mounted) creates a sense of openness that a solid, floor-based unit simply cannot match. Why it works: By exposing the floor beneath the console, you extend the visual line of the room, making the space appear larger. It also eliminates the "dust trap" area underneath that is difficult to clean—a blessing in any home. Best for: Apartments with minimalist or Scandinavian aesthetics, especially those with marble or wood-grain flooring that you want to show off. SG Context: In HDB flats, ensure your contractor uses proper heavy-duty brackets anchored into the wall (not just glued or lightly screwed) to support the weight of the TV and equipment. Pro Tip: Pair this with recessed LED lighting underneath the console. The uplighting effect creates a "floating" illusion and doubles as a cozy ambient light for movie nights. 2. The Full-Height Feature Wall: Storage Without Clutter When floor space is limited, the only way to expand storage is to go vertical. A full-height TV feature wall turns an entire wall into a storage system, eliminating the need for separate bookshelves, display cabinets, or sideboards. Why it works: It consolidates all living room storage into one sleek facade. You can hide bulky items (like luggage or vacuum cleaners) behind closed cabinets on the sides, while keeping the center open for the TV. Design Variations: Closed + Open Concept: Use closed cabinets with push-to-open mechanisms to hide clutter, combined with open niches or glass-fronted sections to display decor and prevent the wall from feeling too heavy. The Monochrome Look: Painting the entire feature wall (including the cabinets) the same color as the surrounding walls makes the unit recede visually, tricking the eye into perceiving more space. Pro Tip: For BTO flats with a "bomb shelter" (household shelter) in the living room, a full-height TV console is an excellent way to integrate the unsightly metal door into the design, making it virtually invisible. 3. The Room Divider Console: Open-Concept Solutions In shoebox condos and studio apartments, the living room and bedroom or dining area often share one open space. A TV console can double as a room divider, creating separation without the need for a solid wall that kills the sense of space. Why it works: It defines zones (e.g., "this is the living room, behind this is the bedroom") while maintaining an open flow. It also allows the TV to be viewed from multiple areas. Design Considerations: Double-Sided Units: Opt for a console that is finished beautifully on both sides. One side houses the TV and media equipment; the other side can function as a dresser, bookshelf, or entryway console. Open Shelving: A floor-to-ceiling unit with open shelving allows light to pass through, preventing the space from feeling closed off. Height Matters: If you need privacy (for the bedroom side), ensure the unit extends to at least 1.5m to block the view of the bed from the sofa. Pro Tip: Use a swivel wall mount for the TV. This allows you to angle the screen towards the sofa during the day and towards the bed at night, maximizing functionality. 4. The Slimline and Shallow Console: Narrow Depth Solutions Many small apartments, particularly older HDB flats and newer shoebox units, have narrow living room layouts where a standard 40–50cm deep console would protrude too far into the walkway. Why it works: A shallow console (20–30cm depth) provides just enough space for the TV base and essential electronics without obstructing the flow of foot traffic. Design Approach: Custom Slim Cabinets: If you are doing built-in carpentry, request a depth of just 25–30cm for the TV console. Use the vertical space above with wall-mounted shelves to compensate for the loss of horizontal storage. Wire Management: With slim consoles, hiding wires becomes crucial. Ensure the unit has built-in cable management holes or a recessed back panel to keep cords from spilling out the sides. Pro Tip: If you have a protruding column or structural beam in the living room, build the console to wrap around it. Turning an awkward architectural "problem" into a seamless built-in unit makes the space feel intentional rather than compromised. 5. Modular and Multi-Functional Systems: Flexibility for Changing Needs For renters or homeowners who prefer flexibility, modular TV consoles offer the ability to reconfigure as your needs change. These systems consist of individual components (floating shelves, cabinets, vertical units) that can be arranged and rearranged. Why it works: You are not locked into a fixed layout. If you upgrade to a larger TV, want to add a soundbar, or decide to create more floor space for a child's play area, you can simply move the modules around. Popular Systems: Swedish giants like IKEA (BESTÅ system) are immensely popular in Singapore for this reason. They offer a vast range of door fronts, drawer inserts, and suspension rails that allow you to create a custom look at a fraction of the cost of built-in carpentry. Pro Tip: If using a modular system, wall-mount the cabinets (using the suspension rail) rather than using legs. This gives you the clean look of a floating console with the flexibility of a modular system. 6. The Integrated Console: Merging with Dining or Study In extremely tight spaces, the TV console may need to share real estate with other essential functions. Integrated designs combine the TV unit with a dining table or home office desk. TV + Dining: A low console that extends into a breakfast bar or a slim dining table. This works well in studio apartments where the kitchen, dining, and living areas are one continuous space. TV + Study Desk: A full-height wall unit that houses the TV on top or to the side, with a fold-down desk or a built-in workstation below. This is ideal for WFH setups in 1-bedroom or 2-bedroom flats where a dedicated study room does not exist. Pro Tip: If combining a desk with a TV console, ensure the desk area has adequate task lighting (LED strips or a dedicated lamp) to reduce eye strain, separate from the ambient lighting used for TV viewing. Key Design Considerations for Small Apartments Regardless of which style you choose, keep these universal principles in mind: 1. Cable Management is Non-Negotiable In a small space, visible wires make the room look messy instantly. Invest in: In-wall trunking (for HDBs, ensure you are not hacking structural walls; surface trunking can be painted to match the wall). Cable management boxes that sit inside the console to hide power strips. Recessed power sockets located behind the TV itself. 2. Proportion is Everything A common mistake is buying a TV console that is too small or too large for the wall. Width: The console should be wider than the TV itself (at least 10–15cm on each side). For feature walls, aim for the console to span at least ⅔ of the wall width. Height: The center of the TV screen should be at eye level when seated (typically 90–110cm from the floor to the center of the screen). 3. Choose Light Colors and Reflective Surfaces Dark, bulky consoles can dominate a small room. Opt for: Light laminates (white, cream, light oak) Glossy finishes that reflect light Glass elements (tempered glass shelves or doors) that maintain an open feel

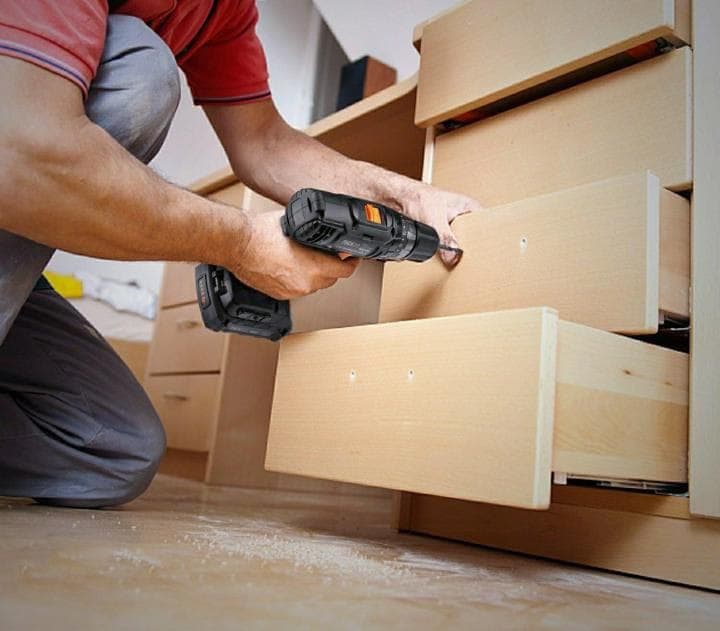
After the kitchen, the bedroom wardrobe is arguably the most critical storage piece in any Singapore home. With our tropical climate demanding frequent wardrobe changes and HDB/condo bedrooms often limited in square footage, selecting the right wardrobe is a balancing act between aesthetics, functionality, and durability. A poorly chosen wardrobe can lead to musty smells, warped doors, and constant clutter. Here is a comprehensive guide to help you choose the perfect wardrobe cabinet for your Singapore home. 1. Know Your Space: Built-In vs. Freestanding The first decision you will face is whether to go with a built-in (custom) wardrobe or a freestanding (off-the-shelf) unit. Feature Built-In / Custom Wardrobe Freestanding Wardrobe Best For Maximizing every inch of space, oddly shaped rooms, floor-to-ceiling storage Rental units, tight budgets, flexibility to rearrange Pros No dust gap on top; customized internal layout; seamless look Portable; generally cheaper upfront; no installation wait time Cons Higher cost; permanent fixture (stays with the house if you sell) Gaps around sides/top; wasted vertical space; dust accumulation on top SG Context Preferred for BTOs and condos to utilize the full height (2.4m to 2.7m) Common in master bedrooms with walk-in alcoves or guest rooms Verdict: For most Singapore homeowners, a custom built-in wardrobe offers the best return on investment, both in terms of property value and practical storage. 2. The Eternal Debate: Sliding Doors vs. Hinged Doors In Singapore's compact bedrooms, the door mechanism is not just a style choice—it is a space-saving necessity. Sliding Doors (Sliding Wardrobe) Best for: Small bedrooms where space between the bed and wardrobe is tight (common in HDB common bedrooms). Pros: Requires no swing space; can accommodate full-length mirrors without taking extra room. Cons: Reduces internal depth slightly (due to the track system); you can only access 50% of the wardrobe at a time. SG Tip: Opt for soft-close tracks to prevent the loud slamming noises that can disturb light sleepers in our compact flats. Hinged Doors (Swing Doors) Best for: Master bedrooms with ample floor space, or walk-in wardrobes (WIC). Pros: Provides 100% access to the entire wardrobe interior; generally more durable over decades; offers a more luxurious, high-end look. Cons: Requires at least 60–90cm of clearance in front to open comfortably. SG Tip: If you choose hinged doors, ensure the swing path does not block the bedroom entrance or clash with bedside tables. 3. Material Matters: Combating Singapore's Humidity This is the most overlooked aspect of wardrobe selection. Singapore’s high humidity (often 80%+) can wreak havoc on wardrobes, causing laminates to peel, wood to warp, and—most distressingly—mold to grow on clothes and surfaces. The Carcass (Internal Structure) This is the "body" of the wardrobe that you do not see. Never compromise here. Plywood: The gold standard for Singapore. It is sturdy, holds screws well, and has high resistance to moisture. It costs more but lasts decades. Particle Board / MDF: Cheaper, but highly susceptible to swelling and warping when exposed to humidity. Avoid for full-height wardrobes unless the room is air-conditioned 24/7. Aluminum: A modern alternative that is 100% waterproof and termite-proof. It is gaining popularity for balcony storage or wardrobes in rooms prone to moisture. The Finish (Exterior) Laminate: The most common choice. High-Pressure Laminate (HPL) is thicker and more resistant to heat, scratches, and moisture than Low-Pressure Laminate (LPL) . Textured laminates (matte or linen) hide fingerprints better than high-gloss. Spray Paint (PU Paint): Offers a luxurious, seamless car-like finish. However, it is softer and prone to chipping in high-traffic homes. It is beautiful but requires careful maintenance. 4. Internal Layout: Beyond the Hanging Rod A common mistake is designing a wardrobe with just one long hanging rod and a shelf. In Singapore, where we own everything from formal office wear to casual shorts and heavy winter wear (for travel), zoning is key. The 70/20/10 Rule: Allocate 70% for hanging (long and short), 20% for drawers (folded tees, underwear), and 10% for high shelves (luggage, bulky blankets). Drawers vs. Shelves: Deep shelves become "black holes" where items get lost. Deep drawers are far more efficient for folded clothes, allowing you to see everything at a glance. Accessories Storage: Incorporate a narrow pull-out rack or dedicated compartment for ties, belts, and jewelry. This prevents clutter on dresser tops. The "Winter" Section: Singaporeans travel frequently. Consider a top shelf deep enough to store a medium-sized luggage or a vacuum bag of winter jackets. 5. Style Trends for 2026 and Beyond While functionality is king, aesthetics define the mood of your sanctuary. Here are the trending styles for Singapore bedrooms: The Minimalist Flush Panel This style uses slab doors with no protruding handles (J-pull or push-to-open). It creates a seamless, wall-like appearance, making the bedroom look larger and less cluttered. It pairs perfectly with matte neutral tones like taupe, dove grey, or off-white. The Glass Accent To break the monotony of solid wood, many homeowners are adding a vertical strip of fluted glass or tinted glass to sliding doors. This adds texture and allows a peek into the wardrobe while breaking up the visual heaviness of a large cabinet. Woodgrain Warmth Similar to kitchen trends, woodgrain laminates (especially in lighter oak or walnut) are being used to create a Scandinavian or Japandi (Japanese + Scandinavian) aesthetic. Using woodgrain for the wardrobe doors adds a natural, calming element to the bedroom. 6. Walk-In Wardrobes (WIC): A Luxury Worth Considering If you have a master bedroom large enough (or if you are combining two rooms in a condo), a walk-in wardrobe is the ultimate luxury. Space Requirements: You need a dedicated space of at least 4–6 square meters to make a WIC comfortable. Open Concept: Unlike built-in cabinets, WICs often use open shelving or glass doors. While stunning, note that in Singapore’s climate, open wardrobes require diligent dusting and a dehumidifier to prevent clothes from absorbing ambient moisture. Lighting: Good lighting is non-negotiable. LED strip lights on motion sensors not only look hotel-like but also help you see your clothing colors accurately in the absence of natural light.
The kitchen is often called the heart of the HDB flat or condo. In Singapore, where space is a premium and the weather is perpetually humid, choosing the right kitchen cabinet design is about more than just aesthetics; it’s about durability, smart storage, and functionality. Whether you are renovating your BTO flat or upgrading your resale home, the cabinet design sets the tone for your entire cooking space. Here are the top 5 kitchen cabinet designs currently dominating Singapore homes. 1. The Minimalist Scandinavian (Scandi) Look Scandi design remains the reigning champion for Singaporean homeowners, and for good reason. This style focuses on light colors, clean lines, and a sense of airiness—a welcome contrast to the dense urban environment. Characteristics: High-gloss white or light oak laminates, flat panel doors (slab doors), and matte black or brushed brass hardware. Why it works in SG: The light colors help small HDB kitchens feel significantly larger and brighter. The use of laminate finishes is practical, as they are easy to wipe down and resistant to the grease common in wok-heavy cooking. Pro Tip: Pair this with a solid wood or quartz countertop to add warmth and texture to the minimalist space. 2. The Industrial Modern Loft As condos and larger BTO flats embrace an edgier aesthetic, the Industrial style has gained massive traction. It moves away from the pristine white kitchen to create a space that feels chic, sturdy, and urban. Characteristics: Dark matte finishes (charcoal, navy blue, or olive green), exposed shelving mixed with closed cabinets, and the use of textural materials like concrete laminates or wood-grain finishes. Why it works in SG: This style often utilizes metal-framed glass cabinets for upper units. These "see-through" cabinets are a brilliant solution for Singapore homes as they break up the visual weight of bulky top cabinets, making the kitchen feel less cluttered while still offering dust-proof storage (a must in our humid climate). Pro Tip: Incorporate a backsplash using large-format marble-look tiles or textured concrete to complete the industrial loft vibe. 3. The Two-Tone Dynamic Gone are the days where the entire kitchen had to be one solid color. The Two-Tone trend is currently the favorite among young couples renovating their BTOs. It typically involves a contrast between the upper and lower cabinets. Characteristics: A popular combination is light upper cabinets (white, cream, or light grey) paired with dark lower cabinets (navy, forest green, or walnut wood). Alternatively, some opt for a contrasting kitchen island. Why it works in SG: Psychologically, dark lower cabinets anchor the space and hide dirt and scuff marks from shoes or pet paws. Light upper cabinets keep the room feeling open. This design also allows homeowners to incorporate bold colors without overwhelming the small square footage. Pro Tip: Use the vertical space. Extend the upper cabinets all the way to the ceiling to avoid the dust trap that is the gap above standard cabinets. 4. Handle-less (J-Pull) Kitchens In a country where "child-safe" and "clean lines" are top priorities, the handle-less kitchen cabinet is a standout trend. Achieved through J-pull profiles or push-to-open mechanisms, this design offers the ultimate sleek facade. Characteristics: Seamless cabinet doors with integrated grooves (J-pull) at the top or side of the drawer, allowing fingers to grip easily without protruding hardware. Why it works in SG: For HDB flats with narrow walkways, protruding handles can be a hazard. Handle-less designs prevent bumped hips and torn clothes. From a maintenance perspective, there are no crevices for grease and dust to accumulate, making cleaning significantly easier—a huge plus in a humid kitchen environment. Pro Tip: While push-to-open systems are popular, ensure you invest in high-quality soft-close hinges from brands like Blum or Hafele, as the constant pushing can wear down mechanisms over time. 5. Textured and Wood-Grain Accents While high-gloss white is a staple, there is a growing desire for biophilic design—bringing nature indoors. Many Singaporeans are now mixing solid-colored cabinets with natural wood-grain textures to add warmth and serenity to the kitchen. Characteristics: Using wood-grain laminate for the base cabinets or a specific feature wall, paired with matte solid colors for the rest. Textured laminates (such as linen or stone finishes) are also replacing high-gloss to hide fingerprints and smudges. Why it works in SG: Wood grain adds a touch of "resort living" to a standard flat. It works exceptionally well in kitchens that open up to a dining or living area, creating a cohesive, warm ambiance. Textured finishes are also more forgiving than high-gloss, which tends to show every drop of water and fingerprint. Pro Tip: Ensure the wood-grain laminate is water-resistant. In Singapore’s humidity, low-quality wood veneers can warp or peel near the sink area.

A kitchen renovation is one of the most exciting home improvement projects. Whether you’re upgrading your HDB flat or giving your condo a fresh new look, hacking away old tiles, cabinets, and walls can transform your space completely. However, kitchen hacking is also one of the most disruptive and potentially damaging renovation stages if not done correctly. At Wei Sheng Electrical and Engineering Pte. Ltd., we specialize in safe and professional hacking and renovation services. Here are our expert tips to help you renovate your kitchen without damaging your home or compromising on safety. 1. Engage Professional Hacking Contractors Kitchen hacking involves demolishing tiles, cabinets, and sometimes walls. This is not a DIY job. Engaging experienced and licensed hacking contractors ensures the work is done safely, efficiently, and in compliance with HDB and condo management guidelines. Our team at Wei Sheng Electrical and Engineering is fully experienced in kitchen hacking. We understand the structural limitations of different properties and use the right tools and techniques to avoid unnecessary damage. 2. Check HDB and Condo Regulations First Before you start any hacking work, it is essential to check the regulations for your property type. HDB has strict guidelines on which walls can be hacked. Load-bearing walls, for example, cannot be removed as they are essential to the building’s structure. For condo owners, you may need to obtain approval from your management corporation strata title before starting any renovation works. We can advise you on the necessary approvals and help you navigate the process smoothly. 3. Conduct a Thorough Site Inspection A professional site inspection before hacking begins is crucial. Our team will assess the condition of your kitchen, identify any potential hazards such as old wiring or concealed pipes, and plan the hacking process accordingly. We also check for asbestos in older HDB flats. If asbestos is present, special handling and disposal procedures are required to ensure safety. Never attempt to hack materials that may contain asbestos without professional help. 4. Protect Adjacent Areas and Furniture Hacking creates a significant amount of dust and debris. Before work begins, we seal off the kitchen area from the rest of your home using plastic sheeting and dust barriers. This prevents dust from spreading to your living room, bedrooms, or other areas. We also cover flooring in adjacent rooms and protect any furniture or appliances that cannot be moved. Taking these precautions saves you from hours of cleaning and potential damage to your belongings. 5. Disconnect Utilities Safely Before any hacking work starts, all utilities must be properly disconnected. This includes turning off the water supply, disconnecting gas pipes, and isolating electrical circuits. Attempting to hack without disconnecting these services can lead to serious accidents. Our team coordinates with our plumbing and electrical specialists to ensure all utilities are safely disconnected and capped before hacking begins. After renovation, we reconnect everything and test for proper function. 6. Use the Right Tools and Techniques Professional hacking requires the right equipment. Heavy-duty breakers, angle grinders, and chipping guns are used for different materials. Using the wrong tool can cause unnecessary damage to surrounding structures or even create safety risks. We use specialized tools for different hacking tasks. For tile removal, we use chipping guns that remove tiles without damaging the underlying wall. For cabinet demolition, we carefully dismantle rather than force removal to avoid damaging adjacent walls. 7. Manage Debris Removal Efficiently Kitchen hacking generates a large amount of debris. Old tiles, broken cabinets, concrete chunks, and other waste need to be removed quickly and safely. Leaving debris piled up can create hazards and delay the renovation timeline. We include debris removal as part of our hacking service. Our team clears the site daily and ensures proper disposal of all waste materials in compliance with Singapore’s environmental guidelines. 8. Identify and Protect Hidden Pipes and Wires Kitchen walls often conceal water pipes, gas lines, and electrical wiring. Accidentally damaging these during hacking can lead to leaks, gas hazards, or electrical faults. This is why a thorough site inspection and careful hacking technique are essential. Before hacking, we use detectors to locate hidden pipes and wires. We then mark these areas and work around them carefully. If any pipes or wires need to be relocated, our plumbing and electrical teams handle the work professionally. 9. Plan for Waterproofing and Structural Repairs After hacking, the exposed surfaces may require waterproofing, especially in kitchen areas near sinks and appliances. Proper waterproofing prevents future water seepage and damage to your new cabinets and flooring. We also check for any structural damage caused during hacking or uncovered during the process. Cracks in walls or uneven surfaces are repaired before new tiling or painting begins, ensuring a solid foundation for your new kitchen. 10. Coordinate with Other Trades Kitchen renovation involves multiple trades — hacking, plumbing, electrical, tiling, carpentry, and painting. Poor coordination between these teams can lead to delays, mistakes, and unnecessary damage. At Wei Sheng Electrical and Engineering, we offer integrated renovation services. Our team coordinates all aspects of your kitchen renovation, from hacking to final finishing. This ensures a smooth workflow, minimal disruption, and a flawless result. 11. Inspect and Test After Hacking Once hacking is complete, we conduct a thorough inspection of the site. We check that all unwanted structures are removed, surfaces are properly prepared, and no hidden damage has occurred. We also ensure that the area is clean and ready for the next stage of renovation. Only after this inspection do we proceed with plumbing rough-ins, electrical wiring, and new installations. 12. Know When to Call the Professionals Kitchen hacking is not a DIY project. The risks of structural damage, injury, or regulatory non-compliance are too high. By engaging professionals like Wei Sheng Electrical and Engineering Pte. Ltd., you ensure that your kitchen renovation is safe, compliant, and damage-free. We handle the entire process — from planning and approvals to hacking, disposal, and final finishing — so you can enjoy your new kitchen with peace of mind.

